CTF Notes for Myself, a Noob: Forensics
Last Updated: June 21, 2025
Summary: Some notes on Forensics in CTFs and practice problems from PicoCTF.
Hidden Files
-
Generally used for data protection.
-
Implemented differently depending on OS.
- Linux/Unix (including Mac OS): Start the file with a
.character.- Find hiden files by doing
ls -al.
- Find hiden files by doing
- Windows: Attribute of file that you can check on or off.
- Linux/Unix (including Mac OS): Start the file with a
Metadata
-
Metadata: Data about data.
- File Metadata: Data about the file.
-
Linux/Unix File Metadata: Owner, group, permissions, timestamps
-
Windows File Metadata: Includes all of the above + hidden, alternate data streams.
- Alternate Data Streams: A whole another file can be stored in a file as metadata.
-
Filesystem Metatadata: Managed by the fileystem and located apart from the data.
-
Filetype Metadata: Managed by the app and located in the data.
Exiftool
- Use to look at file metadata.
exiftool <filename>
Files as Hex (Raw)
- Raw: Open a file with no interpretation using a text editor.
xxd <filename>
xxd <filename> | less # allows you to scroll
Magic Bytes
- Magic Bytes: Bytes in a file that can identify what type of file it is.
Imaging
-
Analysis through software.
-
Always work from a copy, because we don't want to accidentally modify the original data.
dd
- Copies a file, converting and formatting according to the operands. For example,
dd if=hello.txt of=hello-copy.txt
- Can also be used on disks, for example, to create a disk image. For example,
suppose you want to make a disk image of your disk
sda. Use the following command to obtain a compressed disk image.
dd if=/dev/sda | gzip -c sda-image.dd.gz
What is the difference between dd and cp?
lsblk
- Look up your disk information.
Layers
- Disk images are composed of multiple layers.
- Multimedia
- Block
- Journal
- Metadata
- Filename
- Multimedia: Stores partition table.
- Block: Contains the data, split into equal-sized chunks.
- Journal: Used for incremental backup and recover from crashes.
- Metadata: Filesystem metadata (I-nodes).
- Filename: Highest level of the disk image, provides normal shell experience.
Sleuthkit
The Sleuthkit Commands Cheatsheet
- Use to traverse all layers; normally start with the multimedia layer.
| Layer | Command | Usage |
|---|---|---|
| Multimedia | mmstat | Gives information about a partition table. |
mmls | Print partition table. | |
mmcat | Print entire partition (rarer usecase). | |
| Block | blkstat | |
blkls | ||
blkcat | ||
blkcalc | Calculating a block number for an unallocated space. | |
| Journal | jls | |
jcat | ||
| Metadata | istat | Gives information about an inode. |
ils | List I-nodes. | |
icat | Print the contents of a file based on its I-node. | |
ifind | Finds an I-node based on its filename or block number. | |
| File | fls | List all filenames. |
fcat | Print contents of a file based on its path. | |
ffind | Find filename based on its inode. |
- All of the Sleuthkit commands will take the offset of a partition as an
option, so it is important to run
mmlsto get an understanding of the partitions of a disk first.
Autopsy
- A web UI to the Sleuthkit commands.
Steganography
-
Steganography vs. Cryptography:
- Steganography: Conceal information within some sort of medium. Where the information is concealed is less immediately obvious. However, if you know where the information is concealed, then there is no other protection for the data.
- Cryptography: Hiding important information using some sort of algorithm. It is usually very obvious where the information is. However, you must be able to figure out an algorithm to actually obtain the information.
-
Flavors:
- File formatting
- Lease significant bit
- Encrypted embed
- Many many more
bvi
- Allows viewing and editing
bviof the raw file.
Bitmap (.bmp)
-
Simplest image file format.
-
Little Endian file format, so instead of RGB, the bytes are in BGR order.
Steganalysis
- This is very hard. However, it is very helpful even to just know the following things:
- That there is steganography present.
- The original medium.
- The tool used.
Stegdetect
- By abeluck on GitHub.
zsteg
- By zed-0xff on GitHub.
Packet Analysis
- Packet: A single unit of network communication.
- Packet Capture: A collection of many packets taken from a network interface.
- Packet Analysis: Inspecting and studying a packet capture.
Wireshark
- Industry standard packet analysis tool.
Problems
information
-
Use
exiftoolto check the metadata of the file. -
Notice that the License field appears to be a bit odd since it is a very long string of random seeming characters.
-
Given the type of characters used and the length of the string, we guess this is a base 64 encoded string. Therefore, we do
echo cGljb0NURnt0aGVfbTN0YWRhdGFfMXNfbW9kaWZpZWR9 | base64 -d
which returns the flag picoCTF{the_m3tadata_1s_modified}.
Glory of the Garden
-
Use
exiftoolto check the metadata of the file. However, there doesn't appear to be any odd looking metadata fields. -
The flag may be hidden inside the file itself instead. Use
xxd garden.jpg. The flagpicoCTF{more_than_m33ts_the_3y33dd2eEF5}can be seen spread out across the 4 lines at the end of the output.
Enhance!
-
Use
exiftoolto check the metadata of the file. However, there doesn't appear to be any odd looking metadata fields. -
We check if the flag is hidden inside the file itself. Notice that this is an SVG file, which means that it is actually possible to open this using the
catcommand since SVG uses XML to describe images and XML is human readable. So instead of usingxxdwhich would output extraneous hex codes as well, we usecat.
cat drawing.flag.svg
The problem is that cat returns output that does not have any code
highlighting, which makes the output harder to read. Let us open the file with a
text editor instead.
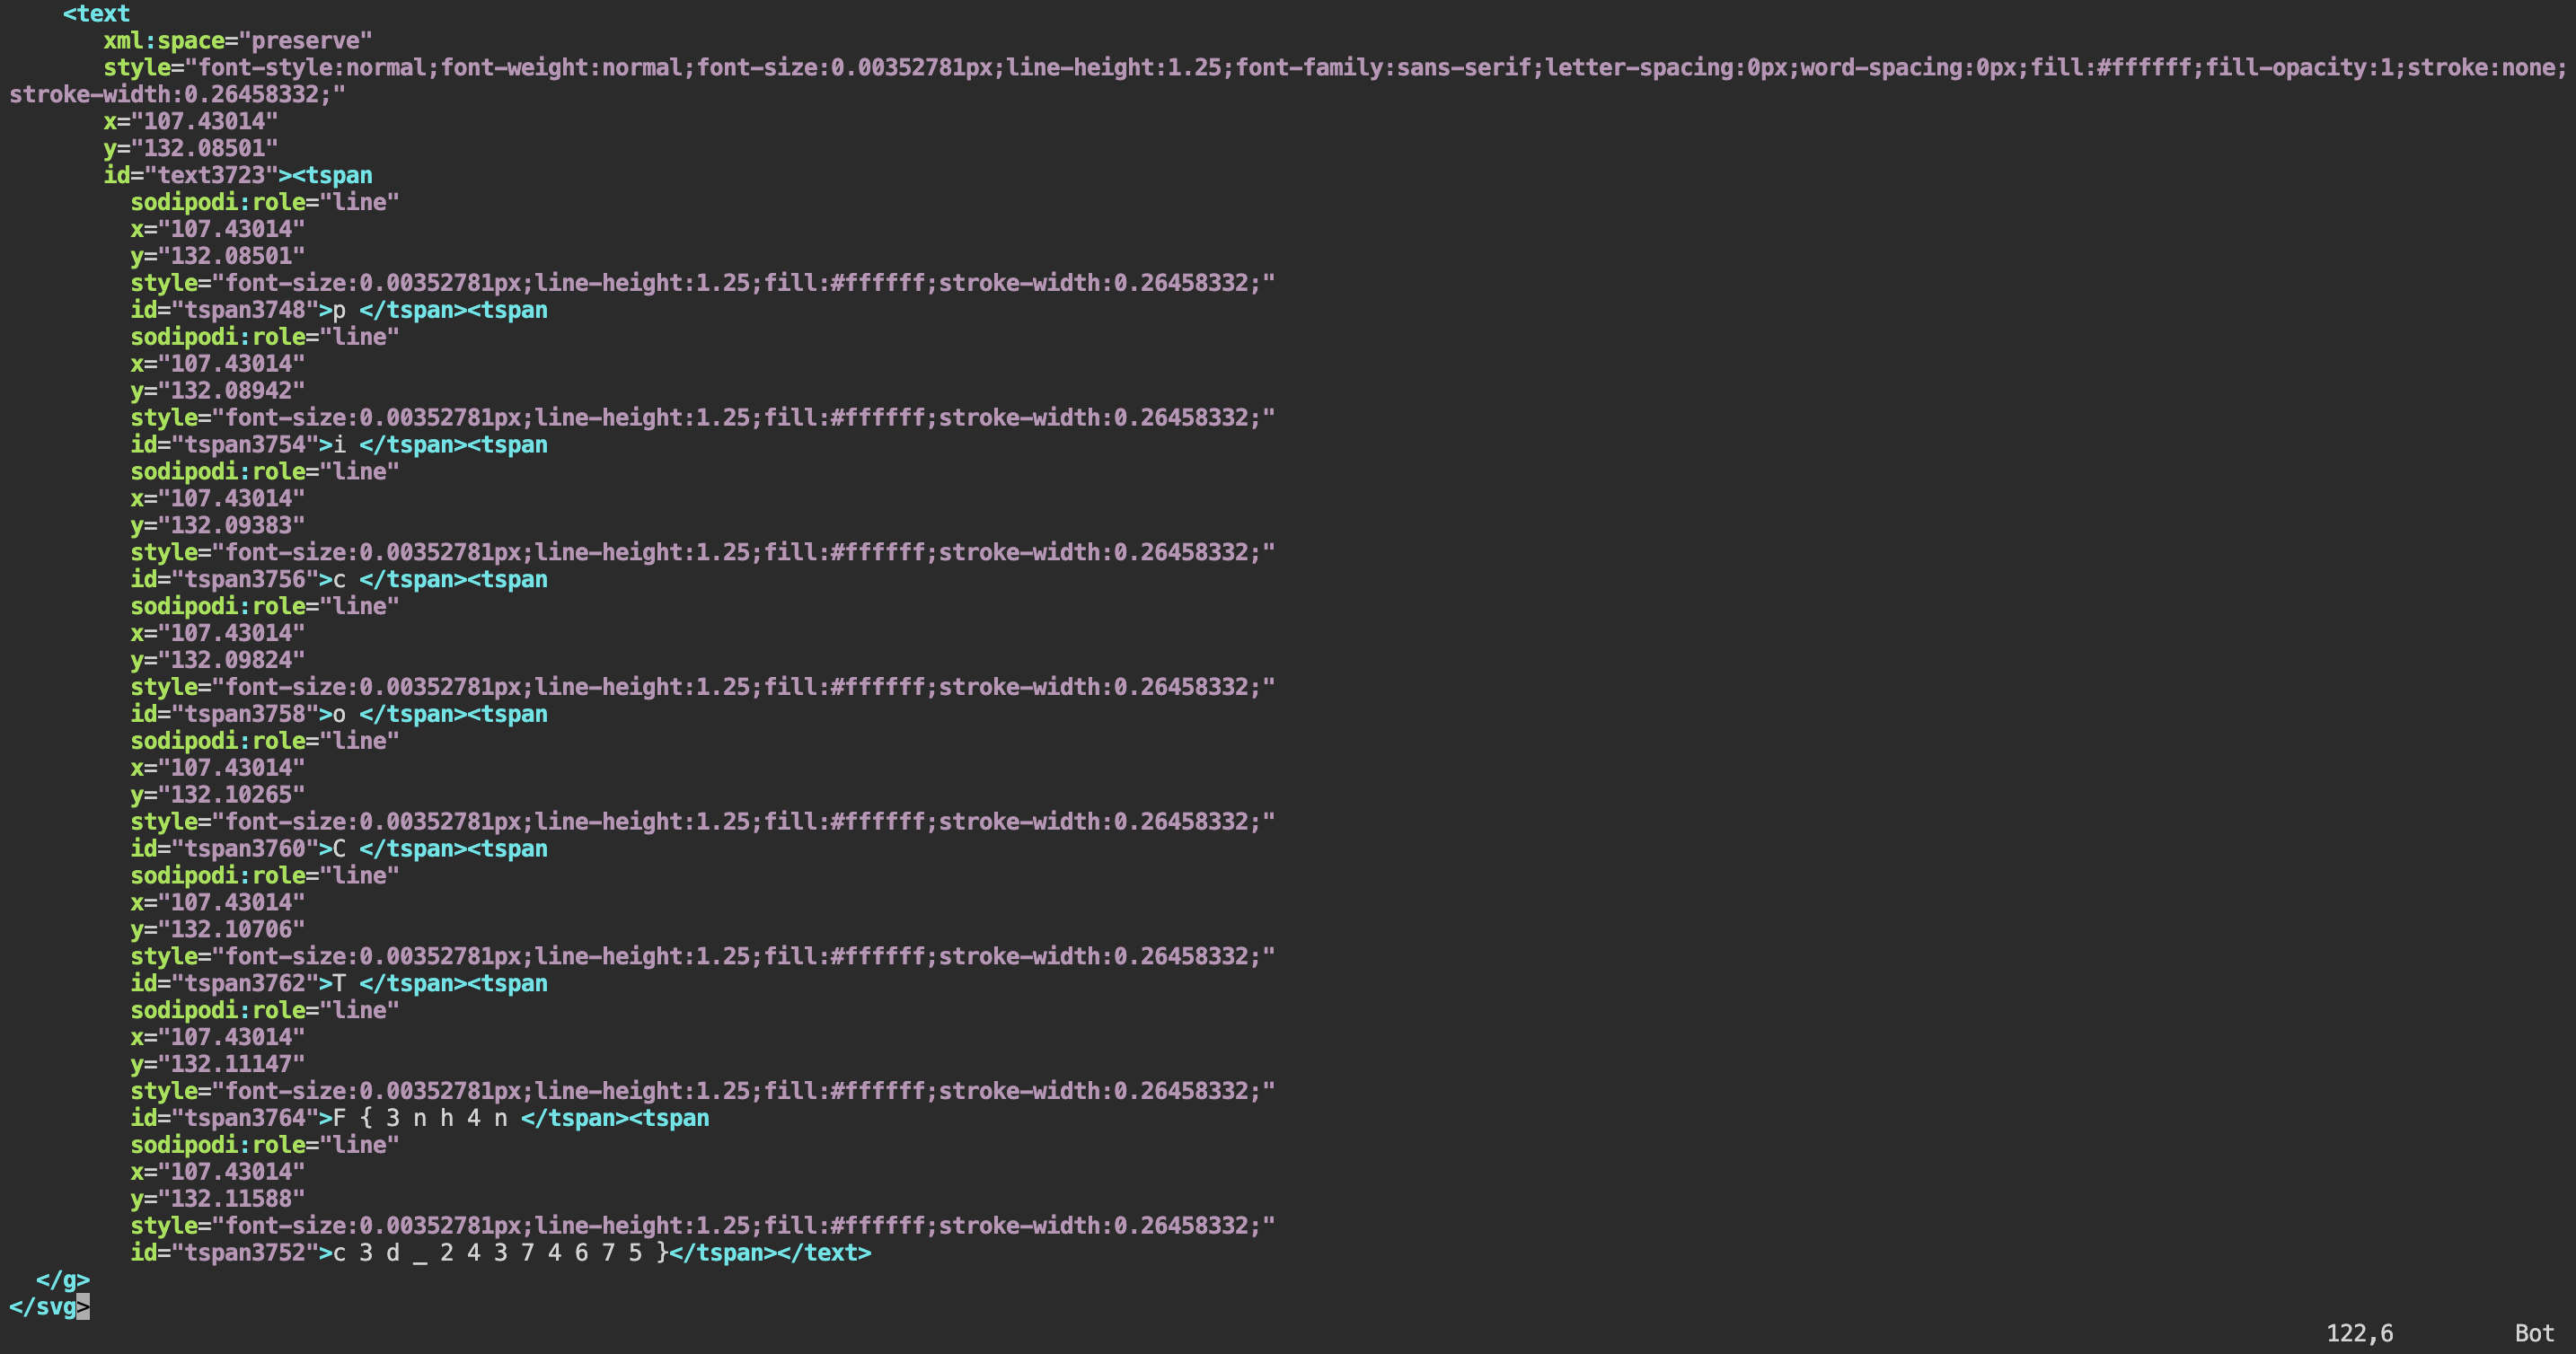
Notice that with the code highlights of vim, there appears to be a suspicious
string of characters in the text portion of the SVG file. The flag
picoCTF{3nh4nc3d_24374675} is actually in plain view stored using different
tspan elements.
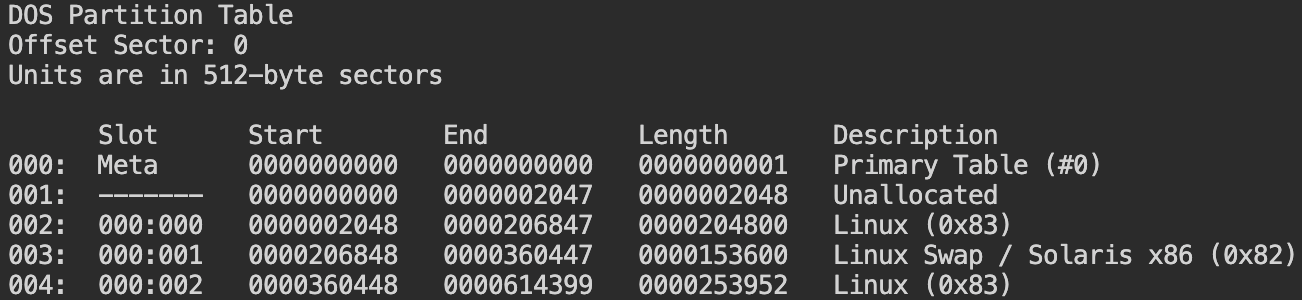
Sleuthkit Intro
-
Download the compressed disk image into the
/tmpdirectory of the PicoCTF webshell and unzip the file using the commandgzip -d <filename>. This results in a filedisk.img. -
Run
mmls disk.img. In the output, look in the Description column for the Linux partition and find the Length value for that partition.

- Connect to the remote checker service following the instructions and type in the value found from the previous step to obtain the flag
picoCTF{mm15_f7w!}.
Disk, disk, sleuth!
-
Download the compressed disk image into the
/tmpdirectory of the PicoCTF webshell and unzip the file. -
Follow the hint in the problem description and use the
srch_stringscommand from the Sleuthkit. Thesrch_stringscommand displays all printable strings in a file. -
If we run
srch_stringsdirectly, you will see that a LOT of output gets spit out immediately. Do Control-C to stop the program since it is likely the flag is hidden somewhere in the output. Instead of going through all the output by ourselves, we smartly use thegreptool to let the computer do the job for us.
srch_strings dds1-alpine.flag.img | grep pico
This results in the flag picoCTF{f0r3ns1c4t0r_n30phyt3_ad5c96c0} ultimately being found.
Disk, disk, sleuth! II
-
Download the compressed disk image into the
/tmpdirectory of the PicoCTF webshell and unzip the file. -
From the problem description, we know we want to somehow get the contents of the file
down-at-the-bottom.txtwhich is stored somewhere in the disk image. Therefore, we know we must use several of the Sleuthkit commands. -
First use the
mmlscommand to find the offset of the partition which is likely to store the file. This offset will be useful for later Sleuthkit commands. -
Next, use the
flscommand to list all the filenames that exist in the disk. Note that by default,flsonly lists the filenames of the root of the disk image. However, it is possible to list all filenames recursively using the-roption. With this command, we get a very long list of output, so let us usegrepto actually find where the file is located.

- Using
grep, we may not be able to find the relative path of the file directly. However, notice that we get a number on the left side of the colon. This number is the inode number, and there is a Sleuthkit command which can actually show the contents of a file based on its inode,icat.
The commands that were run across steps 3-5 are shown below in their entirety:
mmls dds2-alpine.flag.img
fls -ro 2048 dds2-alpine.flag.img
fls -ro 2048 dds2-alpine.flag.img | grep down-at-the-bottom.txt
icat -o 2048 dds2-alpine.flag.img 18291
This results in the flag picoCTF{f0r3ns1c4t0r_n0v1c3_db59daa5}
Sleuthkit Apprentice
-
Download the compressed disk image into the
/tmpdirectory of the PicoCTF webshell and unzip the file. -
Unlike previous questions, there are barely any hints as to where the flag may be except that it is somewhere in the disk image. However, not to worry! We will try to figure it out using the previous processes we followed. First, use
mmlsto determine the partitions that exist on the disk image.
One thing that is immediately notable is that there appears to be three Linux related partitions. Additionally, the first and third Linux related partitions appear to have the same descriptions! Let us check out the files stored on those partitions with the fls -ro command.
-
One thing we notice immediately is that the
fls -rooutput of the first Linux related partition is extremely short while the third Linux related partition's output is much longer. We also identify several other features of interest:
- There appears to be a file entry at the very end of the first Linux related partition's filename output, which is named
$OrphanFiles. What might this file be? Let us do some research. From this page on the Sleuthkit wiki, we see that Orphan Files are deleted files that still have file metatdata in the file system, but that cannot be accessed from the root directory. This is possible because in most file systems, the file metadata are stored in a different location than the filename.

-
There appears to be a lot of file entries in the third Linux related partition's filename output which has a
*character between the file type and the metadata address. Additionally, the(realloc)text also appears after metadata address for several of those entries. What may these mean? According to the fls page on the Sleuthkit wiki, the*character means that the filename is in an unallocated space of the directory, i.e., the file is likely to be deleted. On the other hand, the(realloc)text means that the filename is an unallocated state but the metadata structure is still in an allocated state. -
Finally, just by scanning through the third Linux related partition's output, there appears to be an intriguing entry called
flag.txt. However, we notice that(realloc)appears in the entry. This means that theflag.txtfilename is unallocated in the disk, but that its metadata is still allocated somewhere on the disk.
- There appears to be a file entry at the very end of the first Linux related partition's filename output, which is named
-
Following the above observations, we see right below the entry for
flag.txtthat there is actually another filenameflag.uni.txt. Let us try and view the contents of the file using theicatcommand. The result actually turns out to be the flagpicoCTF{by73_5urf3r_3497ae6b}!
The commands that were run across steps 2-4 are shown below in their entirety:
mmls disk.flag.img
fls -ro 2048 disk.flag.img
fls -ro 360448 disk.flag.img
fls -ro 360448 disk.flag.img | grep pico # tried to run this command but nothing immediately popped out :( manual scanning it is
icat -o 360448 disk.flag.img 2082 # just confirming that the flag.txt file is indeed empty
icat -o 360448 disk.flag.img 2371 # found the flag in flag.uni.txt!
extensions
-
Use
exiftoolto check the metadata of the file. Notice that despite the ending of the file being.txt, theexiftooloutput states that the file is actually aPNGfile. -
Rename the file so that the filename now ends with
.png. Success! We can open the image and see the flagpicoCTF{now_you_know_about_extensions}.
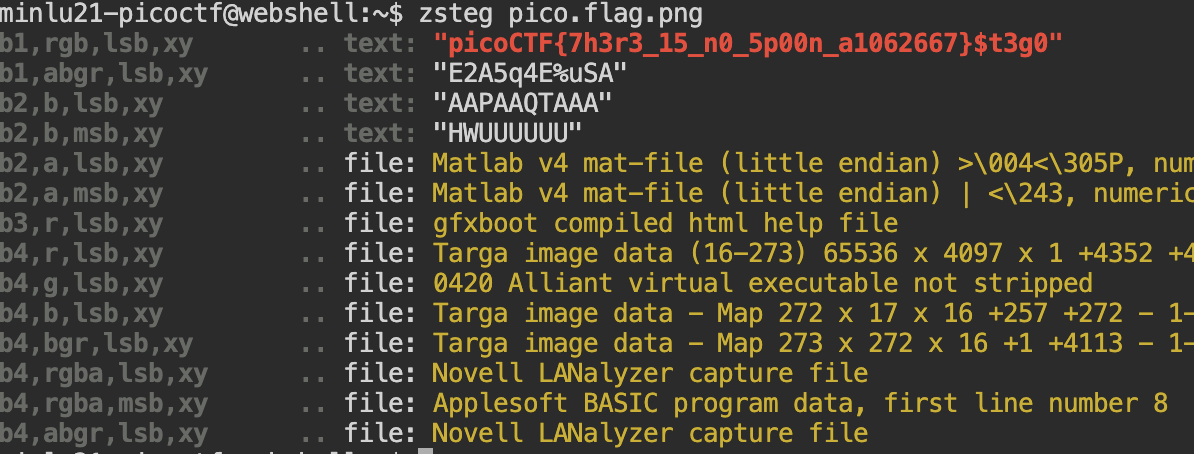
St3g0
-
Trying
exiftool,strings, andxxddid not provide me with any useful output. This means a more advanced steganography technique is likely used. -
After some research, the zsteg tool by zed-0xff was mentioned multiple times. Let us install and try out this tool.
-
Using this tool, we are able to find the flag
picoCTF{7h3r3_15_n0_5p00n_a1062667}.
What Lies Within
-
Trying
exiftool,strings, andxxddid not provide me with any useful output. This means a more advanced steganography technique is likely used. -
Just like before, we try the zsteg tool by zed-0xff.
-
Using this tool, we are able to find the flag
picoCTF{h1d1ng_1n_th3_b1t5}.
Packets Primer
-
Open the packet capture using Wireshark.
-
Look through the hexdump of each of the packets in the packets capture. The flag
picoCTF{p4ck37_5h4rk_ceccaa7f}is found in packet 4.
Wireshark doo dooo do doo...
The flag picoCTF{p33kab00_1_s33_u_deadbeef} is found in packet 827. Notice that for that packet it returns a text/html file.